Mendeley is a free literature management tool. An individual account allows the user to create his/her/their own bibliographic database and footnotes in scientific papers.
The hints for working in Word with the Mendeley Cite plug-in are listed below. They will make it easier to remember ways to insert literature references and bibliographies quickly and easily in the thesis.
Tips for Mendeley Cite plug-in in Word
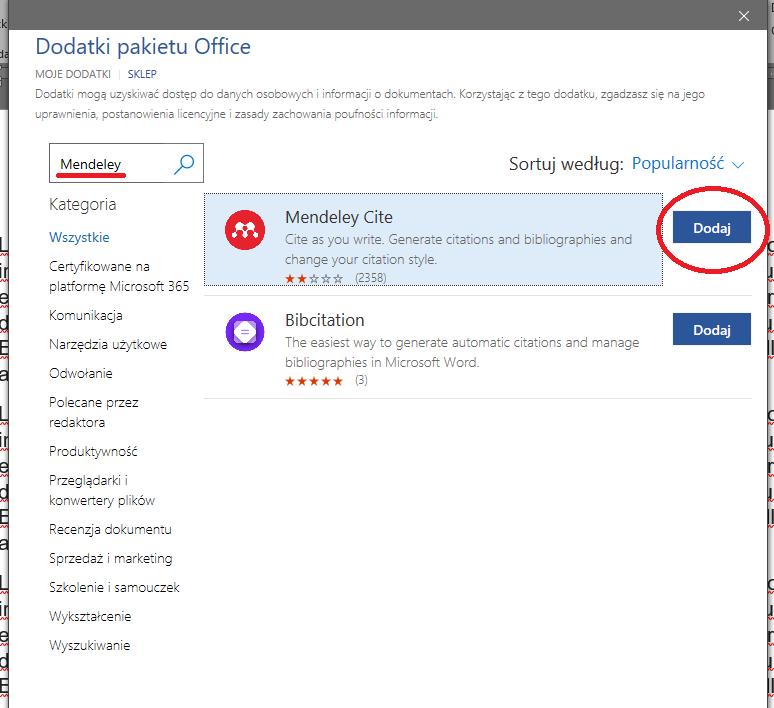
The Mendeley Cite plug-in can be installed from within Word (or from the Mendeley website). To do this, open a Word document and go to the Microsoft Store.
The ‘Office add-ons’ window opens. Type ‘Mendeley’ in the search box and click on the magnifying glass icon. When the Mendeley Cite add-in is displayed, the ‘Add’ option should be chosen.
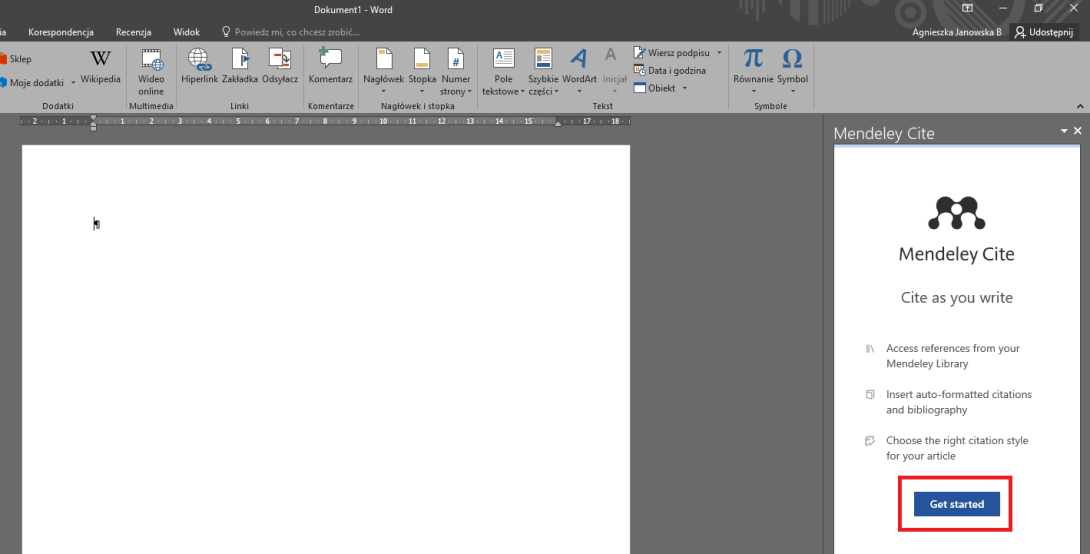
On the right-hand side of the screen, the Mendeley Cite panel will open. Click on the ‘Get started’ button.
The Mendeley login window will open – you need to log in.
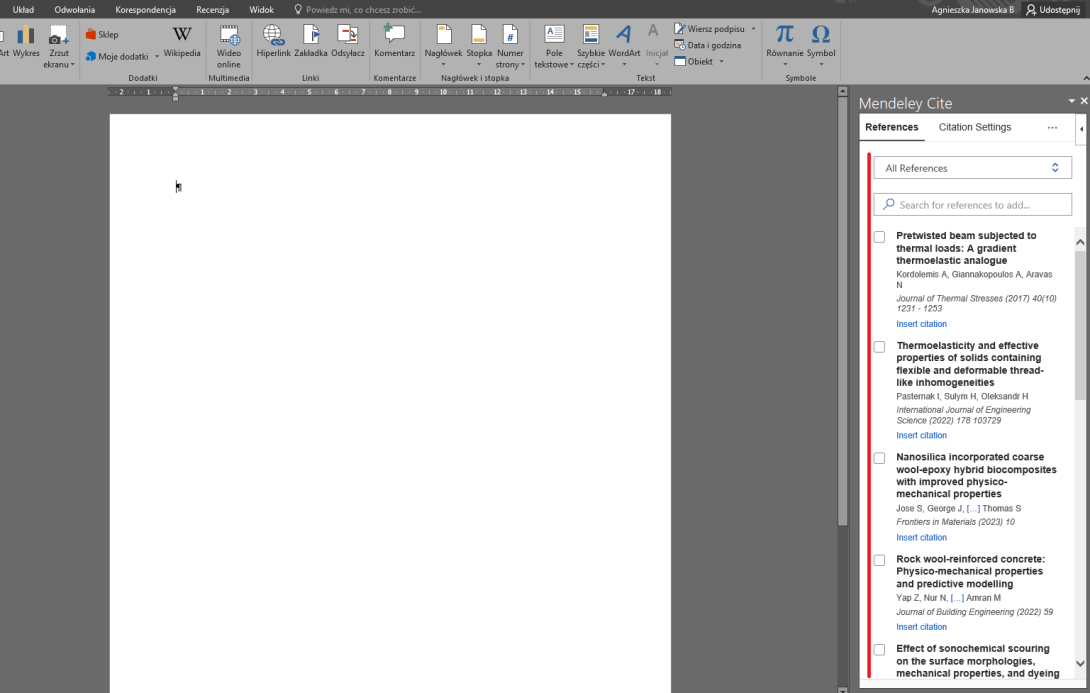
If the plug-in is already added to Word, you will need to call up the side panel when you open the program anew. You will then need to find the installed add-ons in the toolbar. Depending on which version of Word you are using, the add-ons may be located in the ‘File’ or ‘References’ or ‘Insertion’ tab (as in the attached screenshot).
To launch the plug-in, expand the arrow icon next to ‘My Add-ons’ and click on the name of the add-on.
Once the user has logged into Mendeley in Word (this can happen automatically), he/she/they will see a side panel with the bibliographic descriptions of the publications they have added to their Mendeley library.
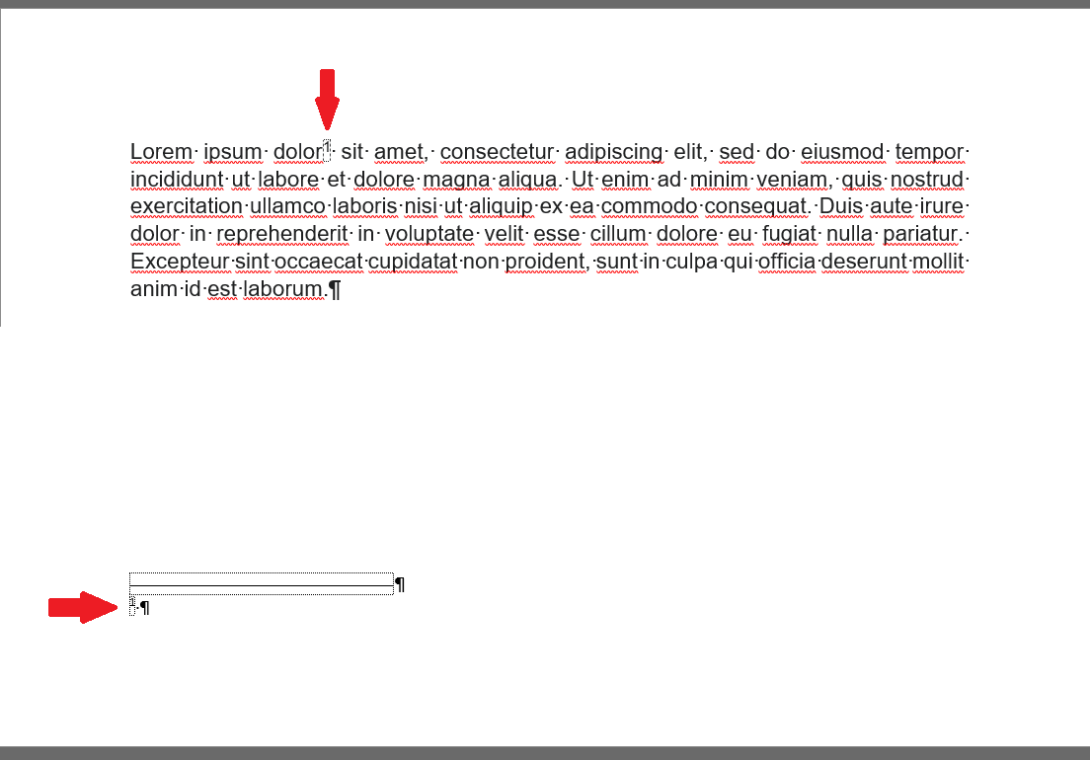
In order to insert a footnote (this type of footnote is required by TUL in dissertations), you need to position the cursor in the text at the place where you want to make a footnote. Then select the ‘References’ tab from the toolbar and click the ‘Insert footnote’ option.
The footnote number will appear both at the cursor position in the text and at the bottom of the page, under the line separating the main text from the footnotes. It is in the footnote section that the footnote content, including literature references, is placed.
To insert a reference to a text, please:
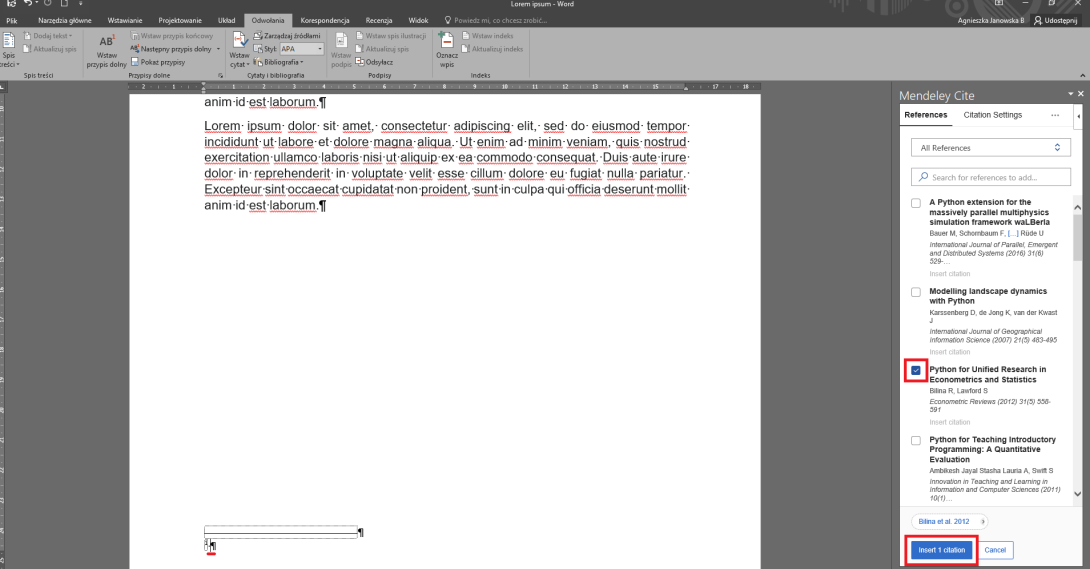
- place the cursor at the bottom of the page – behind the footnote number;
- select the desired publication (or several) and click on the ‘Insert 1 citation’ option (or, respectively, ‘Insert 2 citations’, ‘Insert 3 citations’, etc.) in the Mendeley Cite plug-in panel.
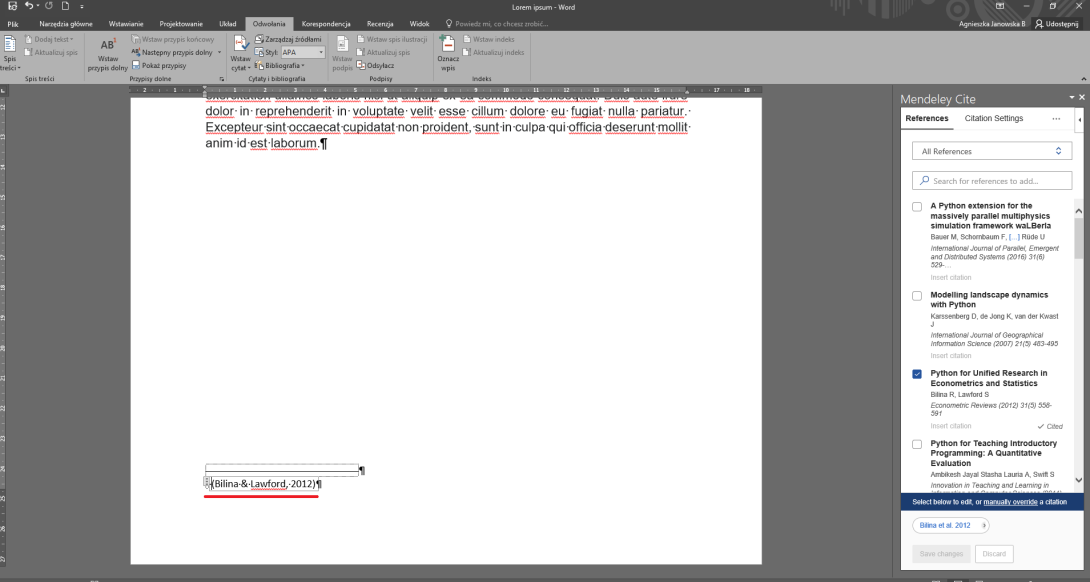
The literature reference is automatically inserted. It is now sufficient to remove the parenthesis surrounding it.
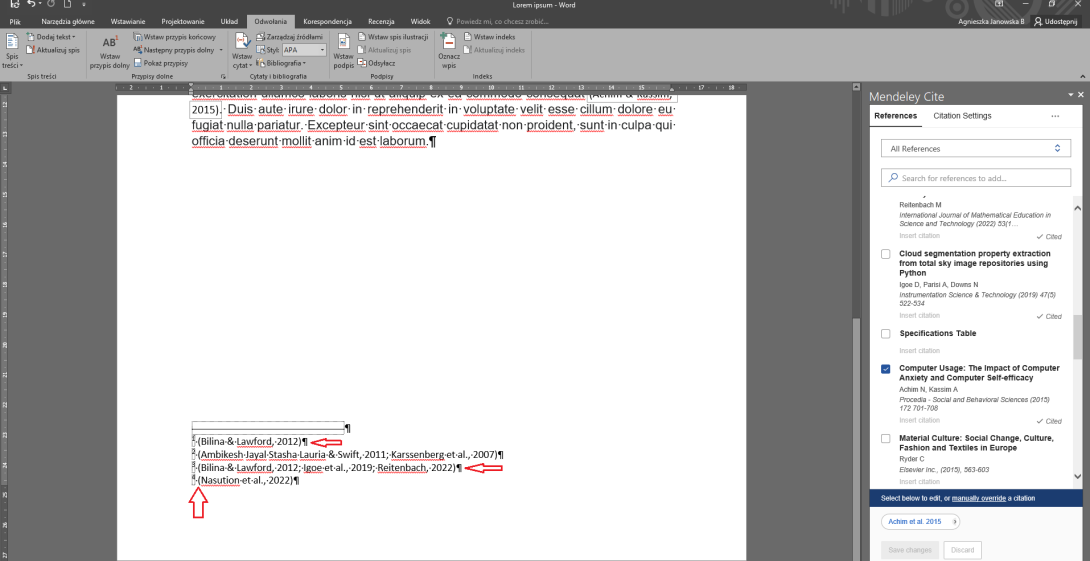
Mendeley Cite is designed to insert literature references in the main text so the data of the cited publication is in brackets. In the footnote, it should not appear in the footnote. Brackets can be removed manually after the insertion of each reference. However, there is a way to remove brackets throughout the document in footnotes only.
To remove the opening parenthesis, please:
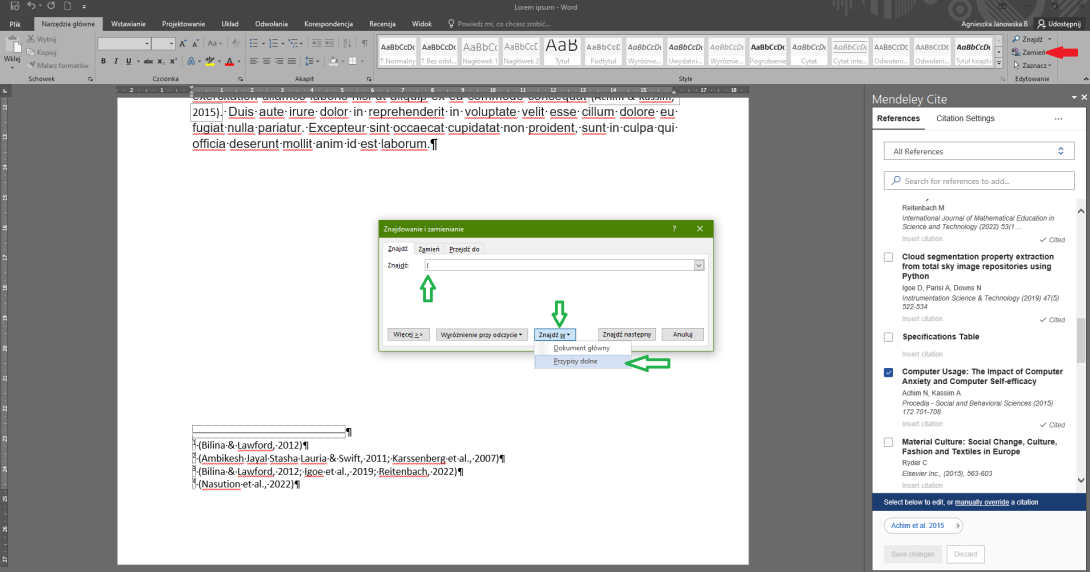
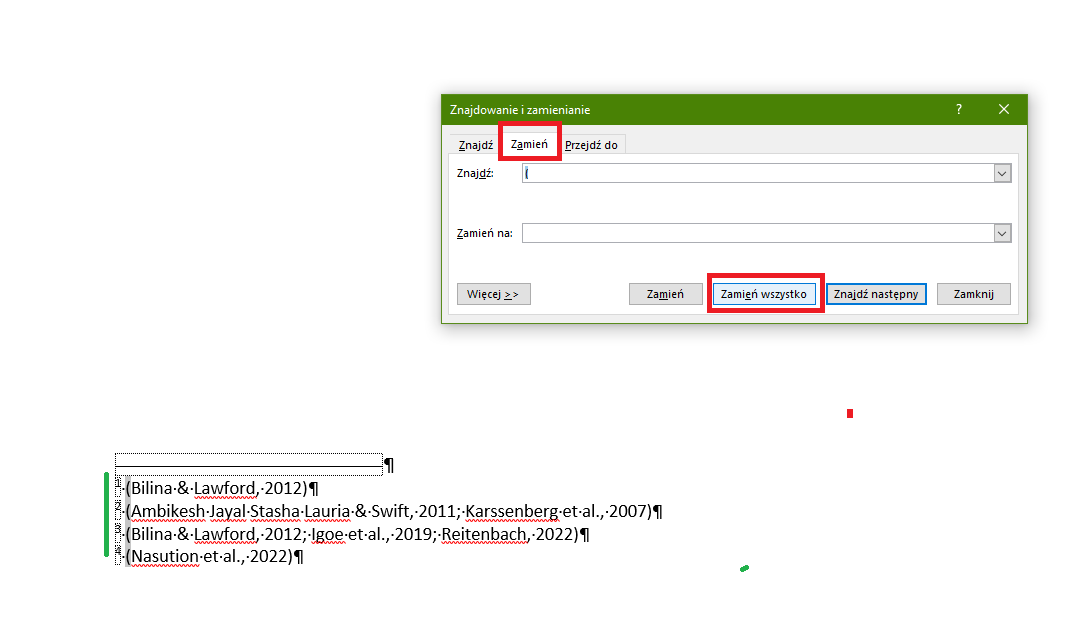
- open the ‘Find & Replace’ window – this can be done by clicking on the ‘Replace’ option on the toolbar in the ‘Main Tools’ tab or from the keyboard using the key combination: ctrl + h;
- type the opening parenthesis – i.e. ( – in the ‘Find & Replace’ window on the ‘Find’ tab;
- select ‘Find in’ from the options available at the bottom of the window and select ‘Bottom footnotes’.
Further, it is necessary to:
- go to the ‘Replace’ tab;
- leave the ‘Replace with’ field blank (the ‘Find’ field has an opening bracket);
- click ‘Replace all’.
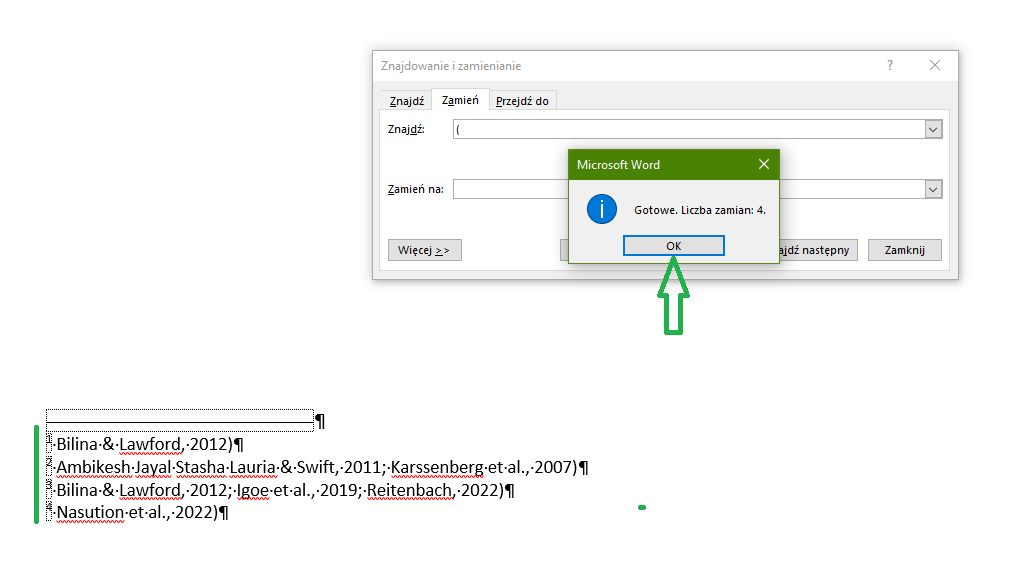
When a window with the number of changes made is displayed, click ‘OK’. The brackets have been removed in each footnote.
The same procedure applies for closing brackets. Thus, to remove closing parentheses, you need to:
- open the ‘Find & Replace’ window – this can be done by clicking on the ‘Replace’ option on the toolbar in the ‘Main Tools’ tab or from the keyboard using the key combination: ctrl + h;
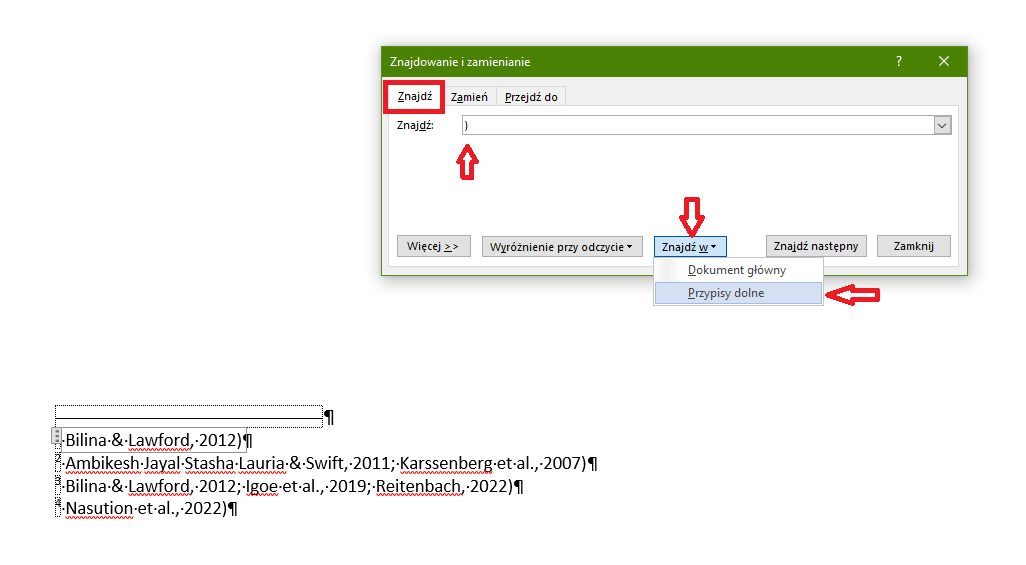
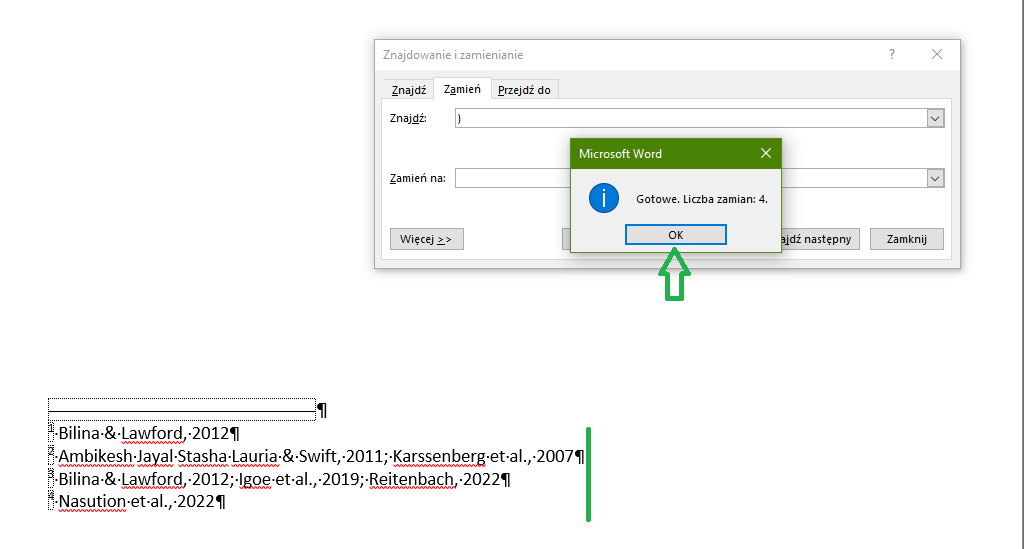
- type the closing parenthesis – i.e. ) – in the ‘Find & Replace’ window on the ‘Find’ tab;
- select ‘Find in’ from the options available at the bottom of the window and select ‘Bottom footnotes’.
Further, it is necessary to:
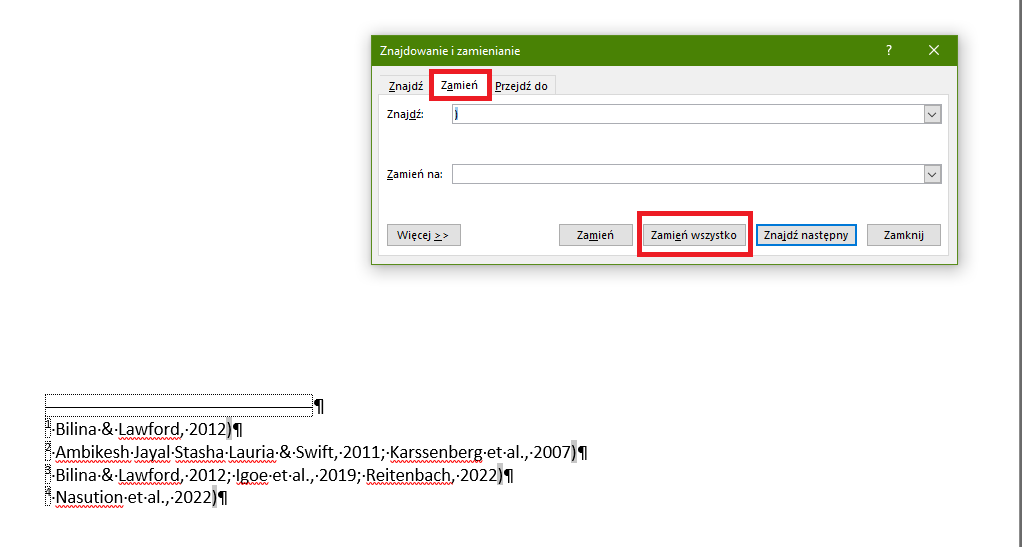
- go to the ‘Replace’ tab;
- leave the ‘Replace with’ field blank (the ‘Find’ field has a closing bracket);
- click ‘Replace all’.
When a window with the number of changes made is displayed, click ‘OK’. The brackets have been removed in each footnote.
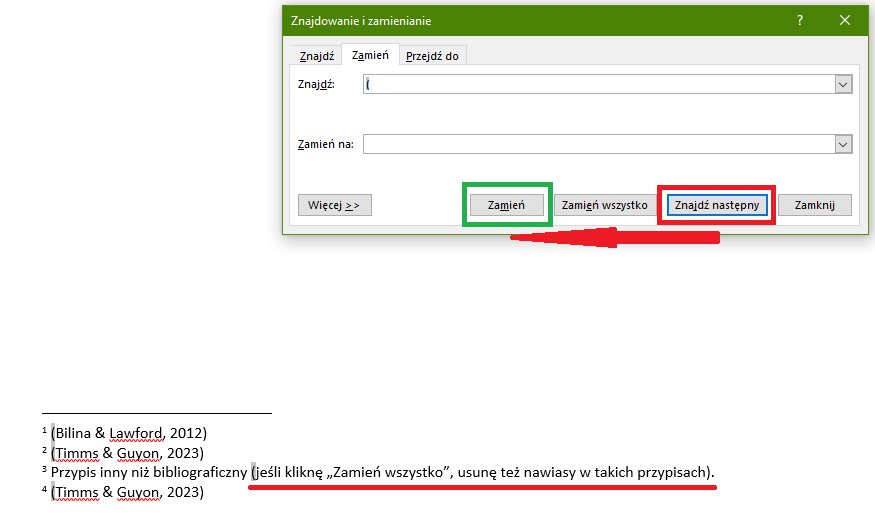
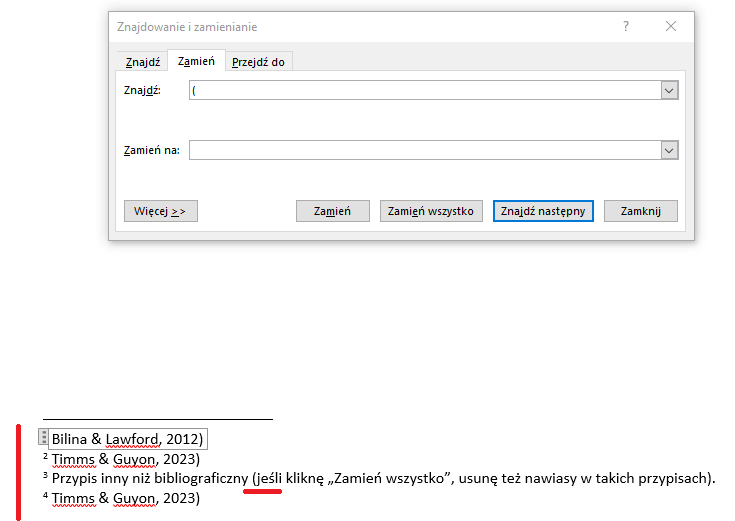
IMPORTANT! If the footnotes are not only bibliographic but will also include necessary brackets, you cannot click the ‘Replace all’ option. In this situation, use the ‘Find next’ button and then ‘Replace’. This will remove the first bracket found by the programme.
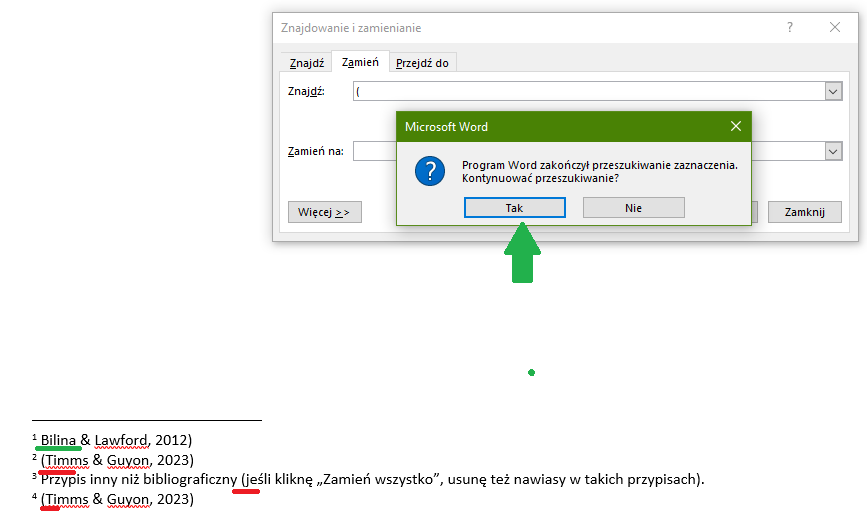
A message will appear on the screen indicating that the programme has finished searching the selection and asking whether to continue searching. You need to select the ‘Yes’ option.
Repeat the ‘Find next’ and ‘Replace’ selections until the programme reaches a non-bibliographic footnote.
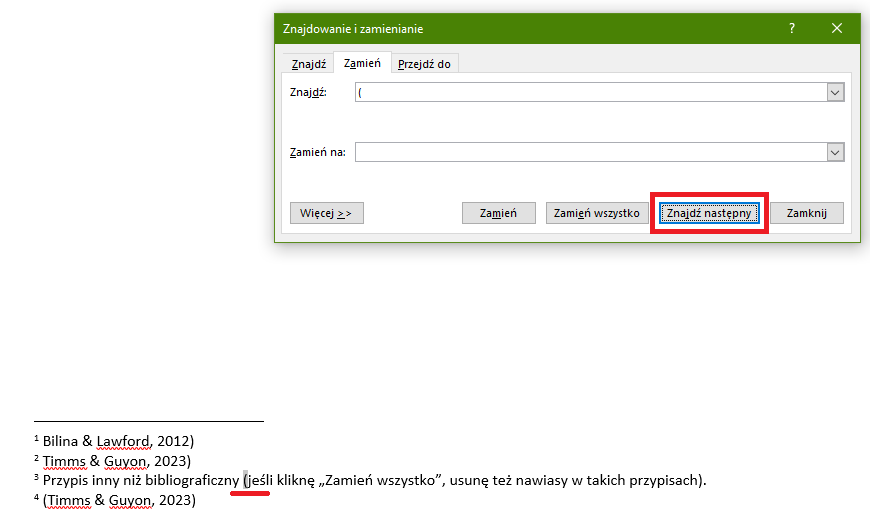
Then you have to skip ‘Replace’ (next to each bracket in a non-bibliographic footnote) and immediately select ‘Find next’.
This will remove all parentheses in the bibliographic footnotes (the pictures in the example are of the opening parentheses only) while other footnotes will be retained.
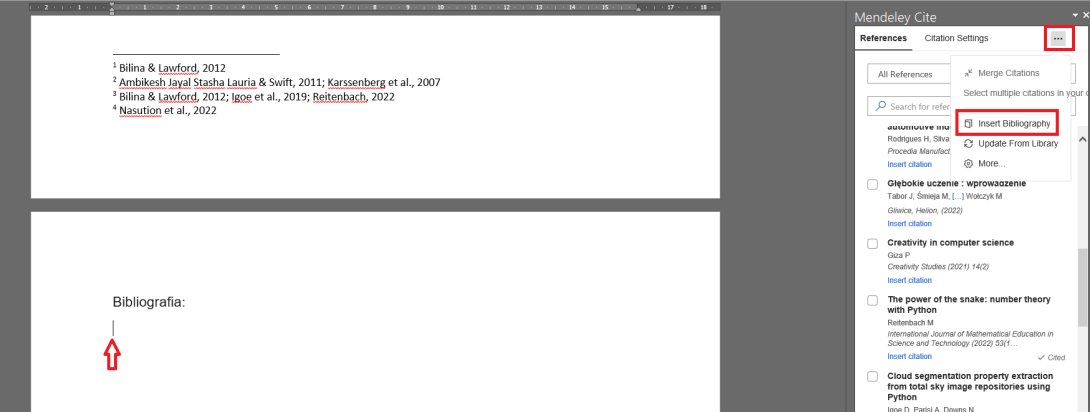
To insert a bibliography into a thesis using Mendeley, you need to:
- start Mendeley Cite plug-in;
- place the cursor at the end of the text of the paper, under a heading such as ‘Bibliography’ or ‘Literature list’;
- find the three horizontal dots in the plug-in panel and click on them;
- select the ‘Insert Bibliography’ option from the list that appears.
Then, you need to confirm the operation with the ‘Continue’ button.
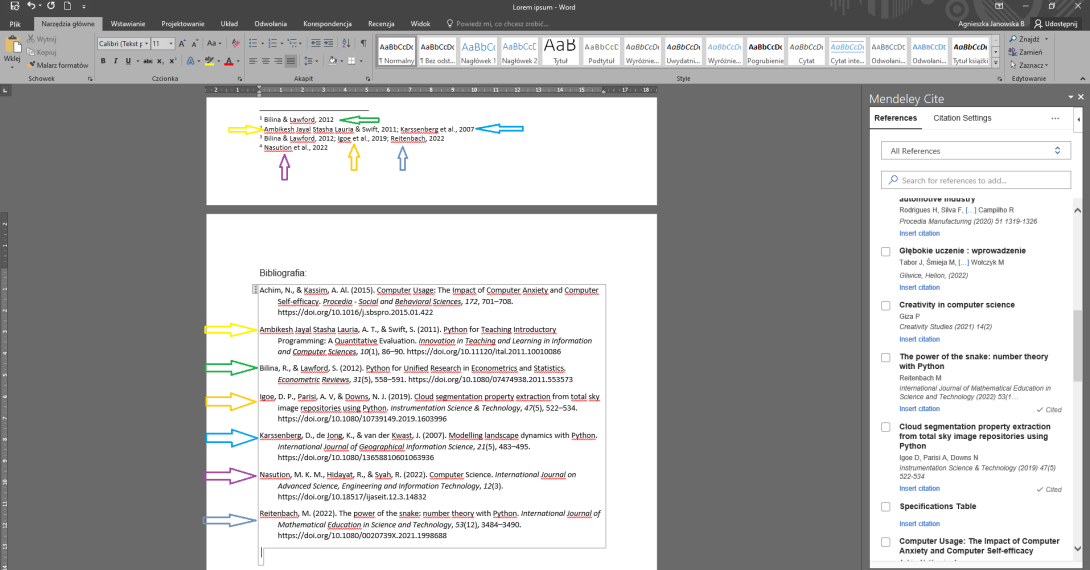
The bibliography will be automatically generated from the references inserted in the footnotes – every publication mentioned in the footnotes will be included in the bibliography.


